Deploying Deep Learning Models On Web And Mobile

Introduction
This project was completed by Nidhin Pattaniyil and Reshama Shaikh. This article details how to create a web and mobile app image classifier and is deep-learning-language agnostic. Our example uses the fastai library, but a model weights file from any deep learning library can be used to create a web and mobile app using our methods.
Summary
The project covers:
- training a deep learning model for food images using fastai
- deploying a web app using Heroku and Flask
- deploying a mobile app
Our Heroku web app is food-img-classifier
Our mobile apps are available:
- iOS Apple store: Food Classifier
- Android Google Play: Food Classifier
Our GitHub repositories:
Citation Note
If you do use our blog or GitHub repos to create your own web or mobile app, we would appreciate it if you would give our work attribution by sharing the below citation:
Pattaniyil, Nidhin and Shaikh, Reshama, Deploying Deep Learning Models On Web And Mobile, 2019
Jump to:
Part 1. Training the Classifier
Part 2. Deploying the WEB App
1. Input to Heroku App
2. File Updates to Make
3. Heroku Setup
4. Our Flask Web Application
Part 3. Deploying the MOBILE App
1. File Updates to Make
2. Our Apps
3. Pricing Options
Training the Classifier
The Jupyter notebook and code used to train the model are available in this GitHub repository: web-deep-learning-classifier
The following were used for model training (see requirements.txt):
- fastai: version 1.0.42
- PyTorch: version 1.0.0
- Python: version 3.6
Deep learning library: fastai
The fastai deep learning library, version 1.0 was utilized. Fastai runs on top of PyTorch. The fastai MOOC was officially released to the public in early 2019.
GPU: Google Cloud Compute
The data was retrieved and analyzed on Google Cloud Platform(GCP). Any cloud platform (such as Paperspace or AWS) is usable, as long as a GPU is available. Instructions for setting up a GPU working environment will be available from fastai.
For this project, we used the Nvidia Tesla P100 with 100 GB of storage.
Dataset: Food-101
The Food-101 data was used which included 101 food categories with a total of 101K images. Thus, each class had 1000 images, of which 250 are manually reviewed test images and 750 are training images:
On purpose, the training images were not cleaned, and thus still contain some amount of noise. This comes mostly in the form of intense colors and sometimes wrong labels. All images were rescaled to have a maximum side length of 512 pixels.
Data Citation
Bossard, Lukas and Guillaumin, Matthieu and Van Gool, Luc, Food-101 – Mining Discriminative Components with Random Forests, European Conference on Computer Vision, 2014
Retrieving the data
The dataset size is 5GB and can be retrieved using:
wget http://data.vision.ee.ethz.ch/cvl/food-101.tar.gz
Unzip data
The tar.gz file can be opened using:
tar xzf file.tar.gz
Training the data: Resnet-34 CNN
Training Time
We used the Resnet-34 CNN architecture. The model took about an hour to run on GCP.
Training the Deep Learning Model
The code used for training the data is available in the repository npatta01/web-deep-learning-classifier in the notebook 1_train.ipynb
We use ImageDataBunch to read in the images. This Python class does the following:
- specifies the path where the images are located
- assigns training/validation ratio to 80/20
- uses the default transformation of images
- sets the image size to 224
- sets batch size to 64
- normalizes the images
path = Path('../data/food-101/images')
data = ImageDataBunch.from_folder(path, valid_pct=0.2,
        ds_tfms=get_transforms(), size=224, num_workers=8, bs=64).normalize(imagenet_stats)
The data is trained on a pre-trained model, resnet34, and we run the learner to determine the optimal learning rate.
learn = create_cnn(data, models.resnet34, metrics=error_rate,pretrained=True)
learn.lr_find()
learn.recorder.plot()
In our case, a learning rate of 0.01 works well
lr = 1e-2
Other Architectures
We did run more complex architectures. However, because the data had 101 classes and for the purpose of this example and article, and GPU time and storage, we used a simple architecture of resnet34.
Back to training
Next, we fit 8 epochs using our learning rate of 0.01, and we observe our error rate drops to 28.9%.
epoch	train_loss	valid_loss	error_rate
1	1.999872	1.817976	0.470594
2	2.006050	1.872519	0.483911
3	1.893473	1.697205	0.441634
4	1.778546	1.497193	0.388960
5	1.572615	1.307390	0.342030
6	1.475655	1.188818	0.310990
7	1.294712	1.108866	0.293218
8	1.248308	1.094019	0.288564
Unfreezing the layers
Next, we unfreezed some of the last layers and looked for a new learning rate.
learn.unfreeze()
learn.lr_find(start_lr=1e-09, end_lr=1e-3)
learn.recorder.plot(skip_end=10)
More training
We trained the data for 5 more epochs, which reduced our error rate from 28.9% to 28.1%.
learn.fit_one_cycle(5, max_lr=slice(1e-8,1e-4))
epoch	train_loss	valid_loss	error_rate
1	1.253053	1.089987	0.286584
2	1.215632	1.080179	0.284901
3	1.177106	1.072547	0.282871
4	1.183173	1.069058	0.282376
5	1.180598	1.069759	0.281436
Confusion matrix
The confusion matrix revealed that the following foods were most commonly misclassified.
[('filet_mignon', 'steak', 26),
 ('steak', 'filet_mignon', 26),
 ('tuna_tartare', 'beef_tartare', 23),
 ('chocolate_cake', 'chocolate_mousse', 21),
 ('pork_chop', 'filet_mignon', 20),
 ('pork_chop', 'grilled_salmon', 20),
 ('chocolate_mousse', 'chocolate_cake', 19),
 ('prime_rib', 'steak', 18),
 ('ravioli', 'lasagna', 18),
 ('breakfast_burrito', 'huevos_rancheros', 17),
 ('beef_tartare', 'tuna_tartare', 16),
 ('lobster_bisque', 'clam_chowder', 16),
 ('steak', 'pork_chop', 16),
 ('tiramisu', 'chocolate_mousse', 16),
 ('chicken_quesadilla', 'breakfast_burrito', 15),
 ('panna_cotta', 'chocolate_mousse', 15),
 ('ramen', 'pho', 15),
Output from the Deep Learning Model
The output of the deep learning model is a file with weights. The file is called model.pth (or final.pth). If you train the model as in this repo, the model is saved to the models folder.
The final.pth file can be downloaded to your local computer from Jupyter.
The model.pth file may be too large to be included in the git commit. There are various options for proceeding with that size dataset:
- Store the model on google drive.
- Store the model on GitHub releases.
- Store the model on a bucket in the cloud.
We stored our final model data file under the “releases” area of the repository: web-deep-learning-classifier/releases
Deploying the Web App
- We are using this repository as a template: web-deep-learning-classifier
- Our web app can be found here: food-img-classifier
Heroku and Flask were utilized to deploy the web app.
Input to Heroku App
This output file from the classifier algorithm, model.pth is the input to the Heroku app.
File Updates to Make
![]() To run your own web app, you need only make the following adjustments:
To run your own web app, you need only make the following adjustments:
- In this file src/config.yaml, updates these fields:
titledescriptionaboutcodesampleImages
- In this file docs/2_heroku_app.md, the following changes need to be made:
- Replace our app name with your app name:
APP_NAME="food-img-classifier". As an example: if you classified birds, your app name could beAPP_NAME="bird-img-classifier"
- Replace our app name with your app name:
Heroku Setup
If you don’t have a Heroku account, create one here: www.heroku.com. Each line can be copied and submitted on the terminal.
Reminder: in your code, you will have updated your APP_NAME
wget -qO- https://cli-assets.heroku.com/install-ubuntu.sh | sh
heroku login
heroku container:login

APP_NAME="food-img-classifier"
heroku create $APP_NAME

heroku container:push web --app ${APP_NAME}

heroku container:release web --app ${APP_NAME}
heroku open --app $APP_NAME
heroku logs --tail --app ${APP_NAME}
Note: After 15 minutes of inactivity, Heroku will suspend the app. The next time the web app is called, Heroku will restart the app. There could be a slight delay in starting the app.
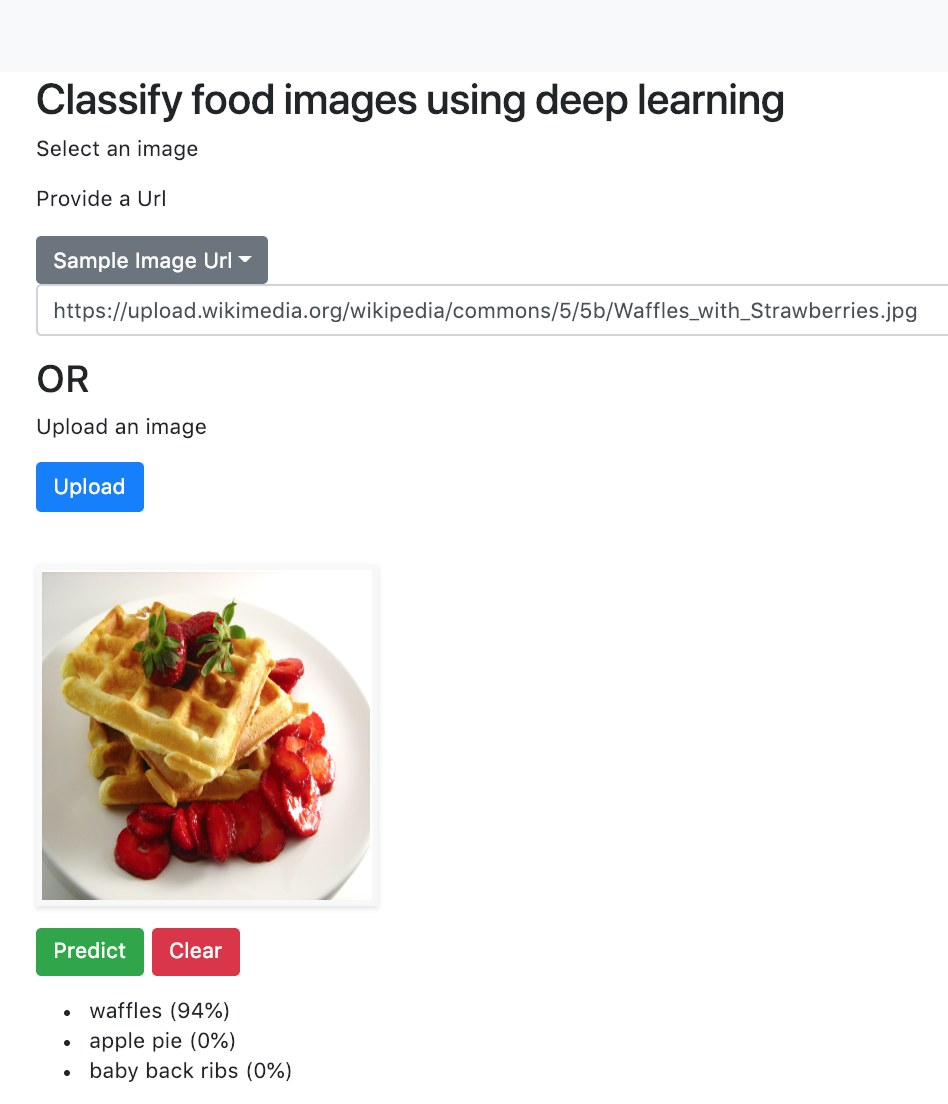
Our Flask Web Application
- Our Flask web app is available here on Heroku:
food-img-classifier - Give it a try! Upload an image or add a URL.
Deploying the Mobile App
The documentation for deploying a mobile app can be found in this folder, docs.
File Updates to Make
![]() To run your own mobile app, you need only make the following adjustments:
To run your own mobile app, you need only make the following adjustments:
In this file config.js, updates these fields:
-
AppConfig- update the
title - point
hostto the heroku app url
- update the
description
Our Apps
Video of mobile app: Watch our 2-minute video demo on YouTube of Food classifier using fastai
Pricing Options
- Apple store: $100
- Android Google Play: $30
- Android using Expo app: Free
- Develop app
- Download Expo on your Android phone
- Open Expo app and scan the app barcode, and give it a try! (can share barcode with others)
Leave a Comment